
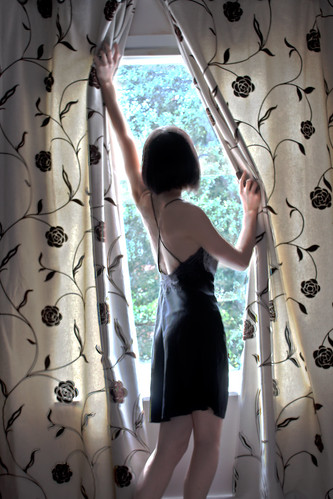
Inspired by Mysnapz "The Picnic", today me and the 450D discovered how to do auto exposure bracketing (AEB), which basically means taking a series of pictures of the same thing at different exposures. The notion behind this is that you can then blend these photographs together to create what is know as an HDR (High Dynamic Range) photograph, an image that will reflect the range of brightness levels that exist in that particular scene (complete black to white). To merge the photos together you can use photoshop's "Merge to HDR" function or a nice bit of software (free trail available) called Photomatix. Once you have merged into HDR you can play around with "tone mapping" (settings automatically pop up with Photomatix or photoshop tutorial here). This allows you to play with the tonal detail displayed and is really needed to approximate the appearance of HDR images.
The mistakes I made really were with the actual photographs - I only got 3 different exposures as auto bracketing only allows for 3, it is better to have more but as I was doing a self portrait doing it on manual (and running to and fro from the camera to change the setting) was really not an option. Secondly I left autofocus on, this meant the pictures were slightly out of line. Also it's important to set the aperture, because changing aperture (ie having it on auto) also changes depth of field. Basically you want exactly the same photograph many times, all settings the same, apart from the exposure.
The output is the image above. It took a bit more photoshopping than I'd have liked - mostly because the outline of the body was a bit to blurry because of the autofocus. But other than that and adding a slight softfocus and tweaking the tones, it came straight out of the camera (three times). You can see below the progression to the finished image.
Three photographs taken at standard, decreased and increased exposure.


Merged to HDR


No comments:
Post a Comment